Been asked for help by Neasa, so I thought I'd blog it here, it would be nice for others too, mind you this is super vague and I'm not an expert so I'm just showing how I went about it.
Video Tutorials on Maya to Motion Part 1, Part 2 from adachan1 on youtube.
Firstly, you need to have your animation data from ViconIQ, in .c3d format- or fbx if you've already messed about with it. You need Maya 2012 if you want to import/export it easily like I did. Also this tutorial uses the skeleton generated by the MotionBuilder characterisation plugin in maya. So if you have a custom skeleton, I can't help you too much with that.
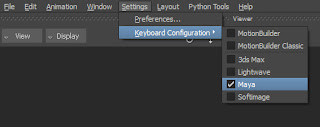 Open up your MotionBuilder, and for your sake, set the keyboard configuration to 'Maya' so you won't have to relearn all the controls again for MotionBuilder. This means things like the move, scale and rotate tools are all asigned to the same 'W, E, R' keys.
 Settings > Keyboard Configuration > Maya
Importing your Animation Data
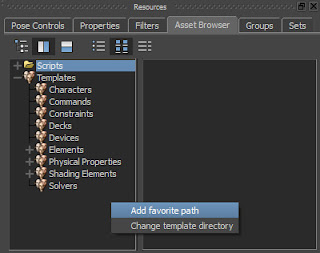 In the Asset Browser tab under the 'Resources' area, you can selet useful files here like the Actor dummy. I added a file directory containing all my animation data, so it was easy for me to access. Right click > Add favourite path. You won't regret it.
So with your folder added, you can quickly select your files through this browser. Click and drag the file over, select the 'Import' option.
Adding an Actor
This guy looks like a mannequin, you need him to help translate the raw data into something your rigged character can follow. So here's how you start assigning all those dots to individual parts:
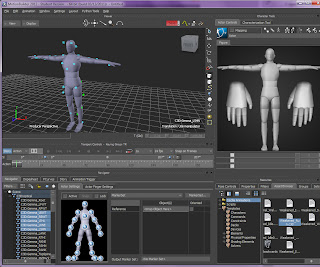
In your Asset Browser > Templates > Characters > drag over the Actor onto the Viewer. It should end up looking like this:
Marker Set
Once both the Actor and the raw motion-capture data are there, you will need to create something called a 'Marker Set' for the Actor. This maps out which dot(s) influences which part of the Actor and will be reusable for the other animations you'll need to convert. After this process, you should be able to simply import a Marker Set and the Actor should be able to bind to the dots without any fuss. Since this is your first time bringing in your motion-capture, we have to create one from scratch.
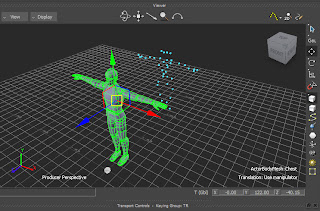 On the time slider, find the best T-pose in your animation, if the first frame is good, just use that. Sometimes your data will have missing/misplaced points on beginning frames, in which case you just need to locate a frame that has all the dots and a good T-pose.
Drag a box over the Actor to select the whole thing, and position it where your dots are.
Keeping it highlighted, scale it roughly to the size of your motion data dots, you should be able to recognise which dots are the head, shoulders, hip area, hands and feet. I didn't have any feet captured, only the ankles so keep that in mind.
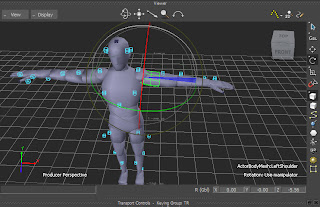
Lastly rotate limbs that are not aligned. When you capture your data, the posture of a human being is not going to be as perfect as this dude's T-pose. So don't worry if it looks a little wonky. I just rotated the arms, and nothing else.
Now the Marker Set. You'll see in the Navigator there is something that is pretty much like the Outliner in Maya. It lists all the items on the scene. If you don't already have the Actor Settings present like seen below, just click Actors > Actor in the Navigation pane. That should bring up the Actor Settings along with the Marker Set table. Click 'Marker Set...' and Create a new one.
 You should notice a bunch of numbers appear over the Actor figure in the Actor Settings. If you click each number you'll notice on the right that there are no markers assigned to them.
The markers are the motion-capture dots- essentially.
In the Navigator list, under Scenes, and then C3D:optical, is a long list of all the motion capture dots. They are named accordingly:
'C3D:[filename]_[dot's identity name]'
They should all have the following names like 'C3D:filename_RPelvis' or 'C3D:filename_STRN'. So long as you labelled the dots correctly in ViconIQ, things should go to plan.
As Mark found out, 'C3D:yourfilename_RPelvis' isn't necessary for our basic rig structure, so for this purpose you can delete it or just ignore it. I deleted mine so that I didn't accidentally select it when assigning the markers.
Assinging the Markers
To make it easier for yourself, change the Display options and tick the X-Ray box. this will show the actor's skeleton and the dots you couldn't see behind the actor. You can see when you select the a dot on the Navigation pane it will highlight green in the Viewer. This will help you determin which dot goes on which body part.
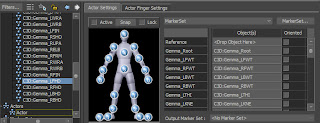 Simply drag an drop the C3D dot names onto the circles, this is the tricky part, I don't actually know how to undo any accidental drop ons, other than to simply create a new Marker Set and start over. So either be careful or experiment before being serious.
You're probably wondering what is the best set up for the markers, I can give you a tip. All the dots that are on the tip of joints like 'C3D:filename_RELB' (that stands for Right Elbow), you should bring it down one step and assign that dot to the forearm. Here's a guide to how I did it anyways:
Exporting and Importing Marker Sets
After all your dots are assigned (make sure there are no overlapping ones like having a dot placed in two marker areas) tickbox 'Active'. You'll see the actor stick to the motion-capture data when you play! If everything is fine and dandy, export that marker set: 'Marker Set... > Export...' I recommend saving it in the same file as your raw data. It will be saved as a .hik file.
If things aren't quite right,
like there are some parts that are twisted the wrong way you can go
back and try again, or use the orient tickbox option. Try it, click on
the number area where things are going a bit funny, a list of the dots
you assigned to it will appear on the right, you notice there's also a
tickbox next to each one? Try ticking it and play the animation to see
if that fixes it for you.
As the above process you will need your animation data and an actor placed into the scene.
When you import your Marker Set, the picture of the actor will appear with red numbers. The numbers are red because it doesn't know where your dots are, so highlight all your C3D dots under Scene > C3D:optical and drag them to the area that has a list of '
Bringing in your Character
 Take note of your very last animation frame in MotionBuilder. I'll tell you why later.
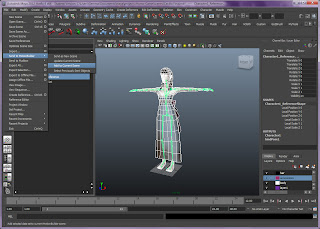
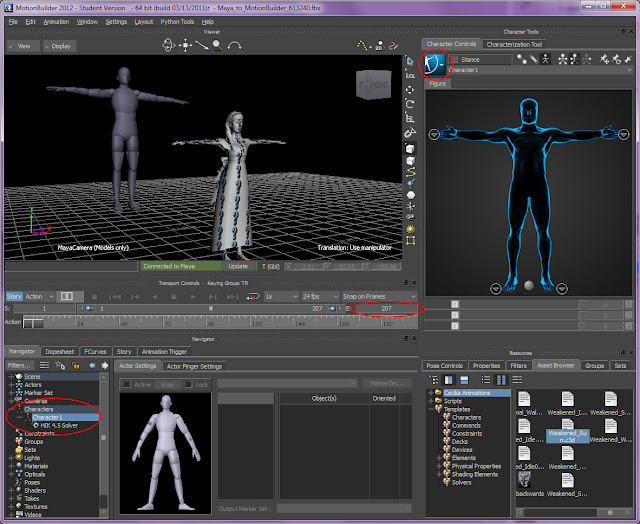
 Keeping MotionBuilder open, open up Maya and your rigged character. Mine looks like this. The skeleton comes from the MotionBuilder Characterisation tool plugin in Maya2012, it's not in 2011, just a warning. So when you reimport it back it should be ready to follow the Actor. If it isn't you need to characterise it with the green man on the side to guide you.
Note: Keep it UNLOCKED. Don't lock it yet, as I found this gave me a few issues. You can lock it later when in MotionBuilder for safety.
I've grouped up my mesh already for easy selection, it doesn't matter if you do this or not, but it saved me a lot of time. Select all your meshes and your rootbone (or in this case the reference point created by the MotionBuilder plugin skeleton).
So once the mesh and route bone are selected:
File > Send to MotionBuilder > Add to Current Scene.
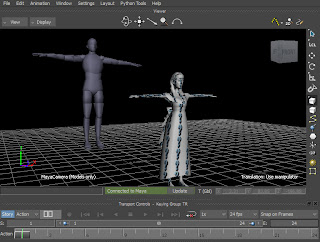 It should update your motionbuilder scene and add your character like so. If your texture didn't come through don't worry about it, you can deal with it later back in Maya. Now the reason you need to take not of your last frame in motionBuilder before importing the character, is because it converts the end frame to the end frame of your imported character, so in this example my animation only played 24 frames. I changed it back by clicking the number on the end of the timeline '24' as shown to the right.
So now in the Navigator, under Character > Character 1 double click it and it will bring up the Character Controls for your character rig. Tickbox 'Lock' in the Character Controls.
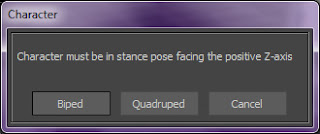 Then when a box pops up, click 'Biped' (not entirely sure what this means yet. But now your character is locked and ready to follow the Actor.
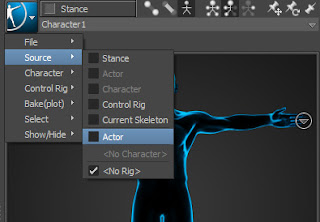
Click the blue square icon on the top-left of the man figure in the Character Controls, Source > click tickbox Actor. Now your Character should follow the Actor when you play!
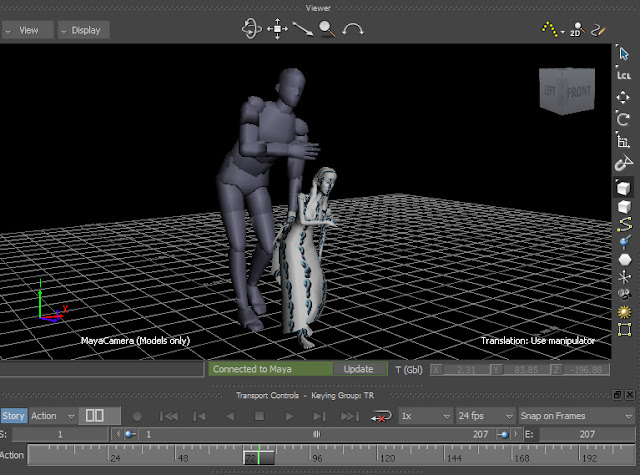
Baking Animation and Exporting
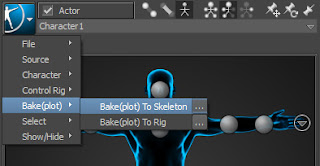 When you've got it playing the part you need, it's time to bake that onto your skeleton, don't worry about the actor, he won't be with you for much longer.
Blue Icon> Bake(plot) > Bake(plot) To Skeleton ... and a box should pop up for the settings.
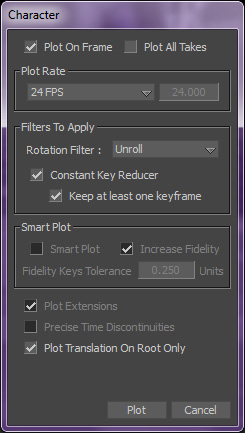
These are the settings I used. By default it should be 30fps, but I found 24fps is easier to deal with, and matches the default fps in Maya.
Click 'Plot' and it will bake your animation to the character's skeleton.
Take it back to Maya as a new scene.
File > Send to Maya > Send as New Scene
Your animation is present! And you'll notice the keyframes are only between the frames you narrowed the timebar to in MotionBuilder. Reassign your texture if you want to (not that it really matters for UDK), save this as a seperate animation file.
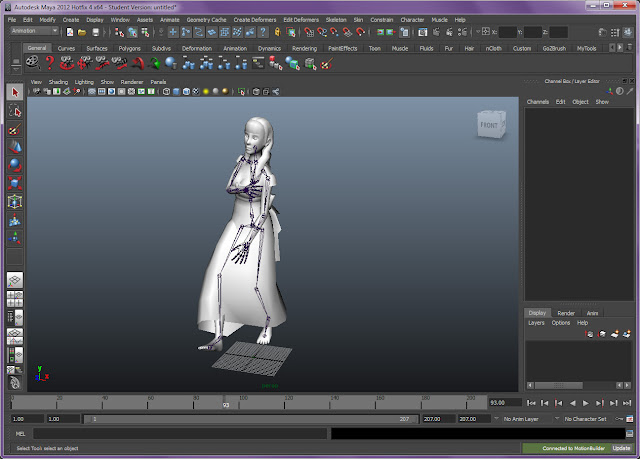
You need your animation to start at frame 0, by default it will probably be 0.2 or 1, so alter that number at the end to '0'.
To move all your keyframes to the beginning, bring up your Outliner, and shift-select the '+' sign next to your Reference name, click twice if nothing happens, and all your hierarchy should open up too. Highlight all your bones and then on the timeline, shift-drag from the first keyframe to the last. You'll notice it hightlights red and has two sets of arrows, a pair in the middle of the highlight and and arrow on each end. Using the arrows in the center drag on the direction, and it will move everything, drag until you hit 0.
There. That's everything I can give for now. Now back to my own work!


0 comments:
Post a Comment